AWS Data Engineering Environment Set up
Data Engineering is one of the hot skills in the current market trend .To be a good data engineer, it is very important to learn many technologies, data domain. To be a good data engineer, it is very important to understand core concept of data engineering and have hands on experience in the tools, do sample projects . In this blog our main intention is to define, what is data engineering and create a development environment so that anyone can start their data engineering journey and create and build simple to complex data pipelines. We are using AWS cloud environment for the set up (If you are in free tier, the environment set up is free but some services like glue are chargeable, beware of it). Please make sure you verify whether the service is under free tier or not before using it.
By saying that, let us understand what is Data Engineering? The below definition is from the book — Fundamentals of Data Engineering ( By Joe Reis and Matt Housley) — Chapter — Foundations and Building Blocks) ( Link — https://www.amazon.co.uk/Fundamentals-Data-Engineering-Robust-Systems/dp/1098108302). This is a highly recommended book to understand the details on Data engineering.
Data engineering is a set of operations aimed at creating interfaces and mechanisms for the flow and access of information. It takes dedicated specialists — data engineers — to maintain data so that it remains available and usable by others. In short, data engineers set up and operate the organization’s data infrastructure, preparing it for further analysis by data analysts and scientists.
Data engineering is all about the movement, manipulation, and management of data.
If you want to compare this concept to our day-to-day life, a good example for a data project is preparing a good curry. A good and delicious curry is prepared by a chef but to build that there are lots of backend efforts are engaged. So same way for having a good AI /ML model or BI report, a lots of backend data processing happened to ensure data is fit for purpose. Data engineers are the real hero to make sure data in collected, ingested, curated, validated before end user start using for business case.
A good concise definition is (Credit goes to Joe Reis and Matt Housley)
Data engineering is the development, implementation, and maintenance of systems and processes that take in raw data and produce high-quality, consistent information that supports downstream use cases, such as analysis and machine learning. Data engineering is the intersection of security, data management, DataOps, data architecture, orchestration, and software engineering. A data engineer manages the data engineering lifecycle, beginning with getting data from source systems and ending with serving data for use cases, such as analysis or machine learning.
Ok we all understood some background of data engineering, a typical question from a new learner where to start the journey. The first thing to learn any field is to set up a development environment and this is our main objective of this blog.
In this article, we will demonstrate how to create a development environment and start creating simple data pipelines in AWS cloud space. The flow of creating a development environment is provided below.

Step -1 and 2 : Create an IAM User for AWS and Assign the IAM role to the user.
It is recommended to create a separate IAM user for practicing and development of data pipelines in AWS. This will enable to restrict access and follow the least privilege principle in AWS. For our development environment, we will create an IAM user and give the administrator privilege ** this is not a best practice in real day to day projects.
1. To create an IAM user, login to AWS console
2. Search for IAM service and click on IAM
3. To create an IAM user click Users in the left panel
4. Give the username, in this case we gave the name as data-engineer-user -001.
5. Select AWS User type (select both Access key – programmatic and password – AWS management console). This way user can connect to aws management console and interact with aws services via aws cli.
6. For password, you can choose Autogenerated password and also select user must create new password in next sign in. For demo purpose, we choose the custom password and give the password and click next.
7. If you do not create a group, better to create a group. This way you can organise the users into a single group and assign the permission at group level. This is an efficient approach to manage the users and group. Select the Create group.
8. Give the group name, in this case we provided the group name as Data-Engineer-Developer-Group. We can assign the policy or permissions at the group level so that all users in the group will automatically get the same set of access. For demo purpose, we provided the admin access to the group.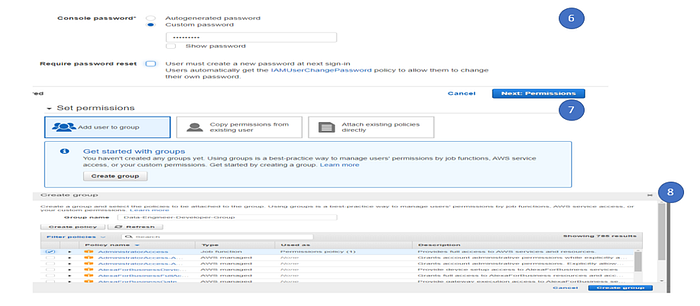
9. Click on the Next tag, (tag is best way to identify resource and easily manage and good for cost management). Here we created a tag called Name and give the value as Data-Engineer and then click Review. This will complete the Step -1 process. 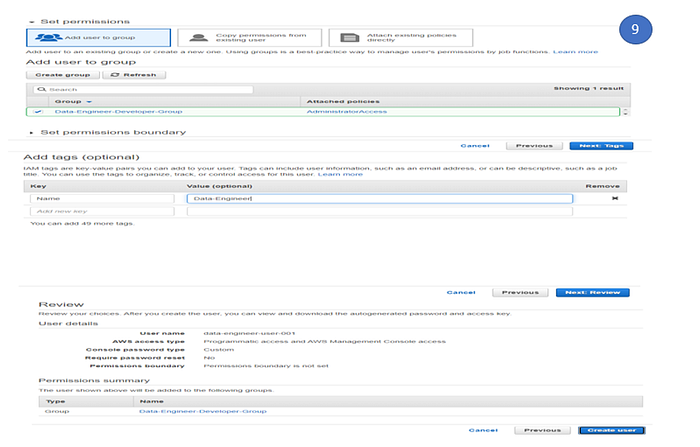
10. Download the Download.csv which contain the user login and credential details. We will login with the new user and do the remaining steps. This will complete the step -2.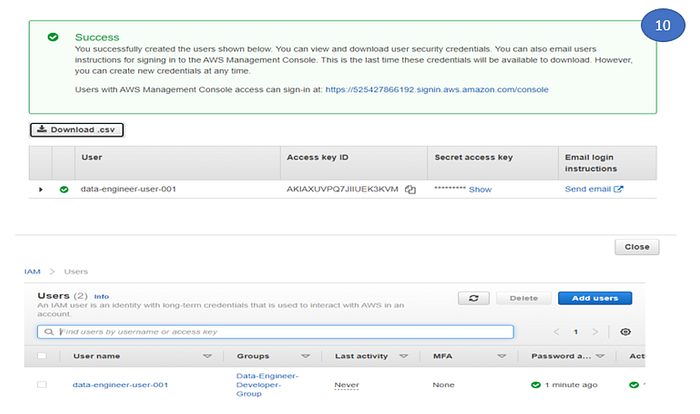
Step -3: Create a Security Group
Security group acts a firewall in AWS EC2 instance to control incoming and outgoing traffic. For our development environment (Which is a EC2 instance), we will create a security group and allow the http, SSH and 8888 inbound rules attach the Security group to the EC2 instance. The reason behind allowing 8888 port is to access Jupyter notebook access from the internet.
To create a security group,
1. Search EC2 instance in Console
2. Click Security Groups (Under Network and Security)
3. To create a new security group, click create security group
4. Give the basic details of the security group (Name, Description, VPC ( In this case we selected the default VPC))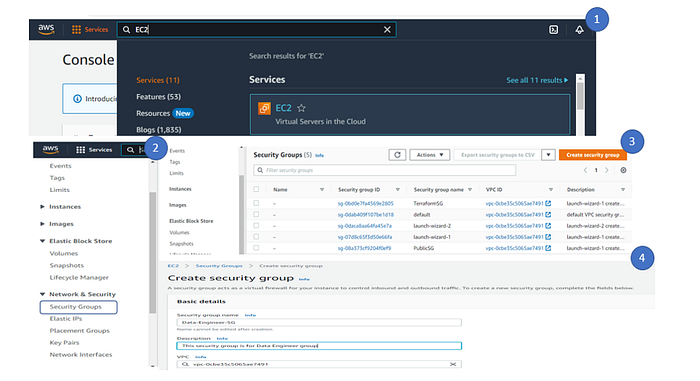
5. In inbound rules, click on Add rule and add http, ssh and port 8888 traffic. By default, all outbound rules and allowed, so no change is required for this development environment
Note – It is NOT a good practice to incoming traffic from anywhere rather block to a specific server. For our demo account and easy approach, we allowed all traffic.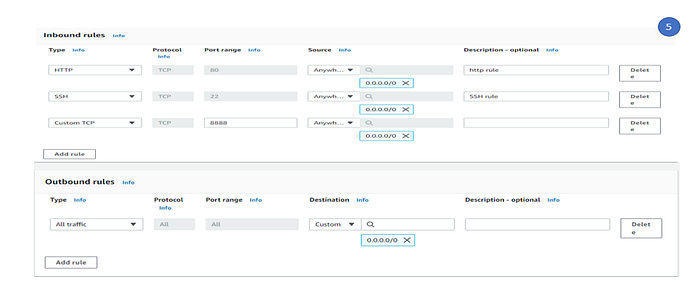
6. In the tag, maintain the same tag name as Data engineer and click create security group to create the security group. This complete the Step -3 process.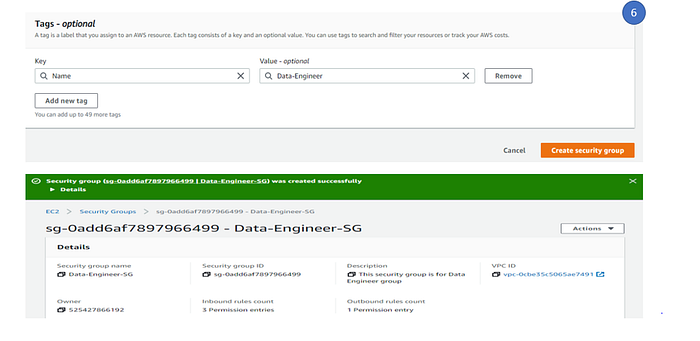
Step -4: Create an EC2 instance and configure
We used EC2 instance –Linux environment for setting up the development environment.
To create an ec2 instance,
1. Search EC2 in aws console
2. Click on EC2 Dashboard view
3. Click on Launch instances
4. Give the name of the instance, in this case we provided the name as DataEngineer-Development.
5. Under Application and OS images ( AMI – Amazon Machine Images), select Amazon Linux( aws). Since we are in free tier, we selected the Amazon Linux 2 Free tier eligible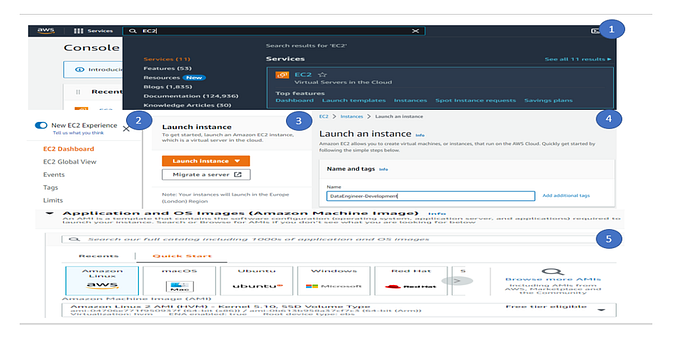
6. Under key pair section, create a new key pair (this will require do ssh to the dev environment).
7. Give the Key pair name and click create Key pair. This new key pair will download automatically to the download folder in user system.
8. Under Network setting, select existing security (we will add the security group which is created for Data Engineer).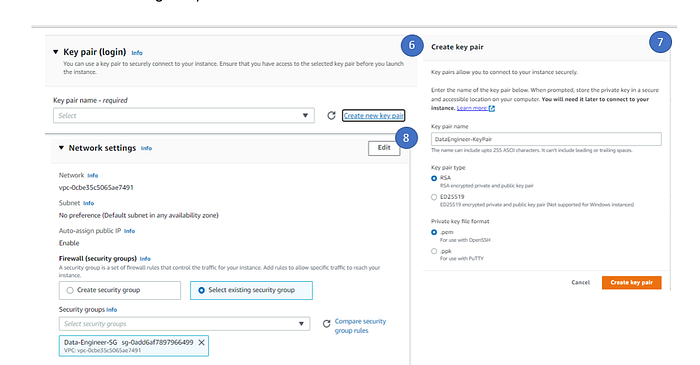
9. Under Configure storage, by default 8 GB is allocated to the root volume ( since 30GB space is available under free tier), we update the root volume to 15GB. No changes require in Advance details, if user have some user data ( wants to run the some boot strap script, user can add it under user data section of advance tab). Click Launch instance to launch the instance.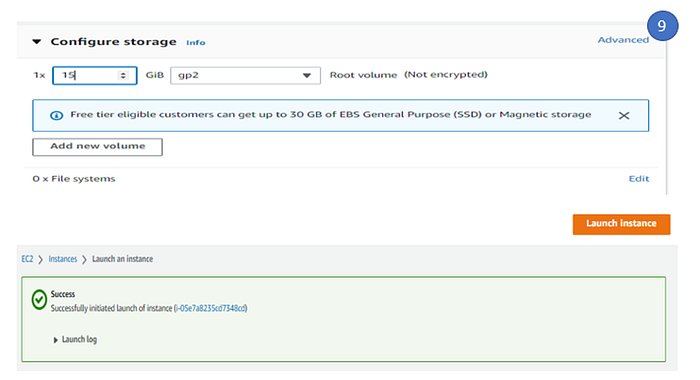
10. Click on the instance dashboard to see the new instance created, it will take couple of minutes to complete the instance status check to complete.
11. To connect EC2 instance, there are multiple options are there. User can connect via putty using the key pair. Here we will use system manager to connect EC2 instance and this way you do not need any additional client in your system. To do the same, we need to add an Role (Which will have system manager access) and attach the IAM role to the EC2 instance. We already have a role called (EC2-S3-Full-Access) which have require permission of EC2, S3 and SSM ( System Manager) and attached this role to EC2 instance.
To attach the role to EC2 instance
1. Select the EC2 instance, click on Action -> Security ->Modify IAM Role
2. Select the IAM role from the drop down and click update IAM role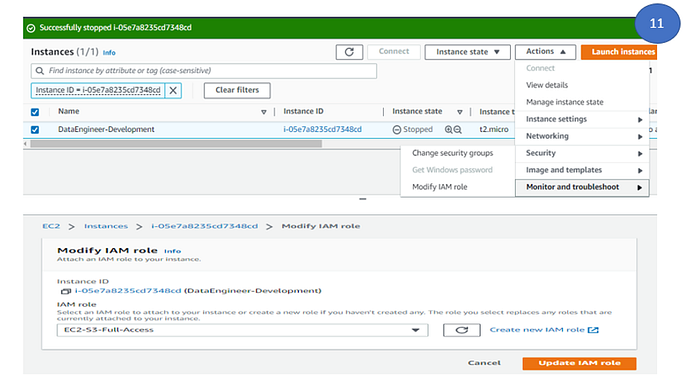
Note – For demo purpose, we added the full permissions, however in real project environment, least privileges should be added.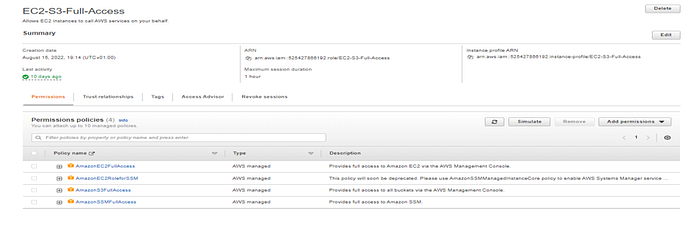
12. To configure EC2 instance, login EC2 instance via System Manager.
1. Search System Manager in AWS console
2. Click on the Session Manager (Under Node Management)
3. Click on the Start Session and you can see the instance in the session list
Note – If the instance is not available, please wait for some time as it may take some time to reflect it.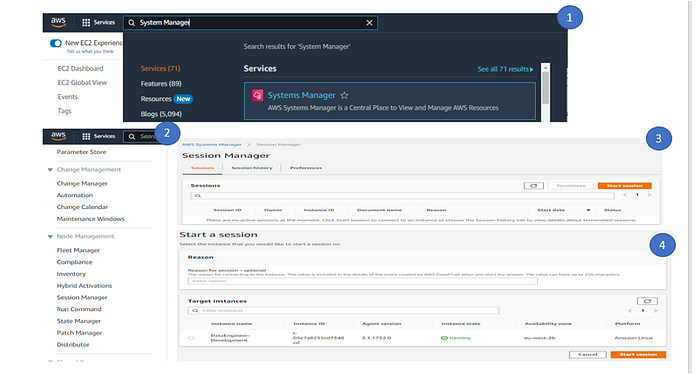
13. Select the instance and click on Start session. This will pop up a new window . By default to connect AWS EC2 instance ( linux based), a default user is created . Usually it is ec2-user. You can find the user details by selecting the EC2 instance -> connect. We will configure the ec2 instance for our development environment using this user. 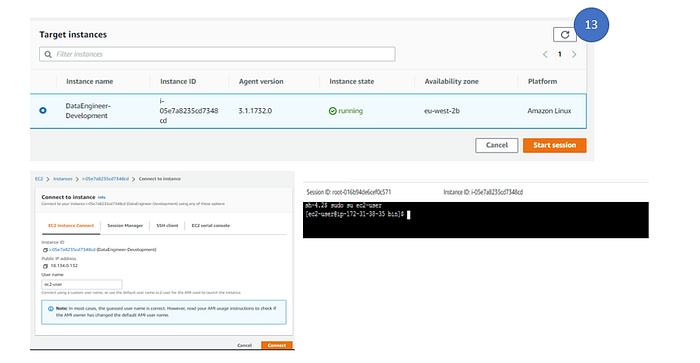
14. The first configuration, we will do to see the python installations. To know which versions of python is available in the ec2 env, type python and press 2 times tab bottom. It will display all python versions installed in the instance.
We will use python3 ( which is same as python 3.7 ) for configuring our environment. Create a directory called aws_data_analytics and we will use this folder for all our set up.
To create a directory, type
1. First type cd to go to the root path
2. Type mkdir aws_data_analytics to create a directory
3. Type cd aws_data_analytics to go to the directory

This completed the step-4 to create an ec2 instance and have some basic configuration.
Step -5: Configure Python and virtual env on EC2
Since python is already installed by default and we also created a directory called aws_data_analytics, we will use this folder to configure the virtual env.
To create the virtual env.
1. Type python3 -m venv data_engineer_env
2. To activate the virtual env,
cd data_engineer_env/
cd bin
source activate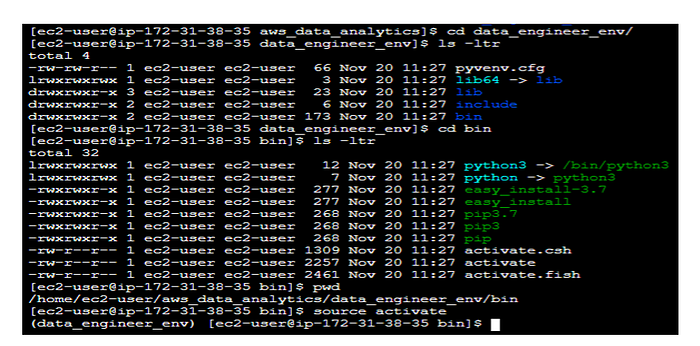
3. Now to connect and interact with different aws services, we can add roles to the IAM role attached to the ec2 instance or configure aws cli. By default aws cli is installed in ec2 machine. To know aws cli version type aws –version
4. To configure aws credentials
1. Type aws configure
2. Give the access key and secret key ( this information is available in the credential csv file which is downloaded earlier ( while creating the IAM user)
To check whether we are able to interact with aws services ( like s3) or not, type
aws s3 ls / (This will list all s3 buckets)

This completes the step -5. So we have an ec2 instance, python configured ( by default) and also create a virtual environment and configure the aws credentials
Step -6: Configure Boto3 and Juypter lab in the ec2 virtual environment
Boto3 is a python library specially designed for interact with different AWS services via API. For python programming and work with AWS, it is highly recommended to understand how to use boto3. ( See the boto3 documentation — https://aws.amazon.com/sdk-for-python/). This is the AWS SDK for python and highly used by cloud engineers in day to day activity for automation, interacting with aws services etc.
To install boto3,
1. Type pip install boto3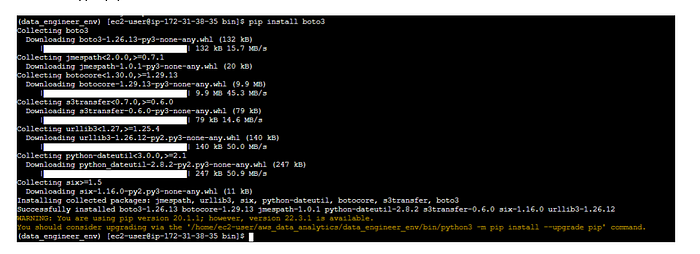
To check whether boto3 is working or not. Type python3 to login to python interactive mode .
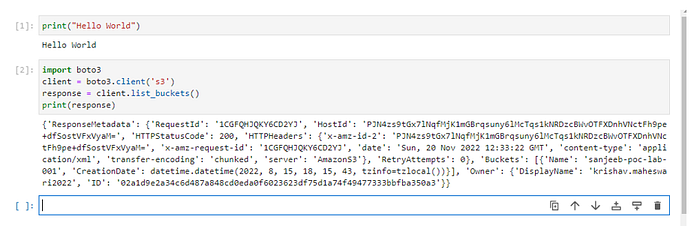
1. import boto3
2. define a client object client = boto3.client(‘s3’)
3. call the s3 API like response = client.list_buckets()
4. print(response) . This will print the response in JSON
Note – The details API details for boto3 is available in the link - https://boto3.amazonaws.com/v1/documentation/api/latest/guide/quickstart.html
This complete the boto3 configure. To configure Jupyter lab
1. type pip install jupyterlab
2. To start Jupyter note book, type jupyter lab --ip 0.0.0.0
This will give you the link to connect Jupyter page and token details. Copy the link and open and internet explorer and paste it.
Note –
a. It is highly recommended to restart the session to connect Jupyter noterbook.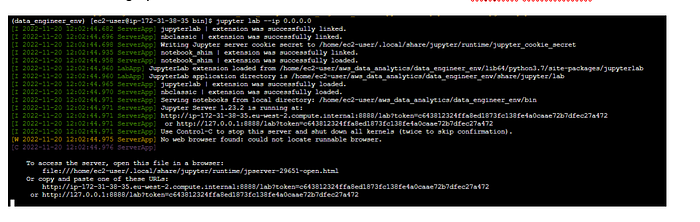
Note -
If you ar restarting the ec2 instance, ensure your public DNS will change and also you need to start juypter lab manually everytime. We will see how we can run this back ground later point of time.
We restarted the ec2 instance and that is why public DNS changed. We used the correct public DNS and access the jupyter lab page.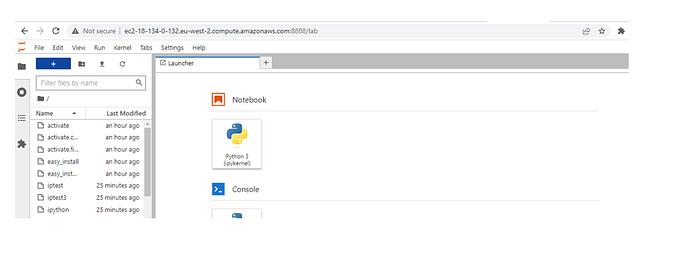
3. If you want to run Jupyter in back ground, user can run it in nohup mode.
nohup ./jupyter lab --ip 0.0.0.0 &

Note -
To get the token details, tail nohup.out file and get the token details.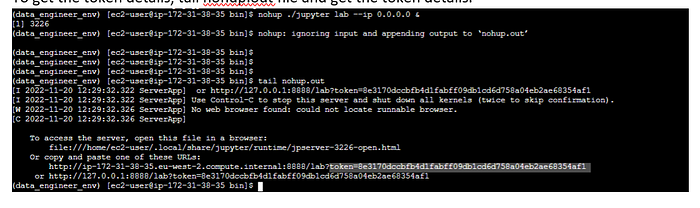
For validation whether click on File-> New -> Notebook and user can test sample python code and also able to test the s3 connection via boto 3 library
Congratulations, you are able to create a development environment and configure require software to start your data engineering journey in AWS.
The Github link for this project is: